The first thing I would do on any lever action rifle is to get decent sights and a good sling. First, lets talk about sights. The majority of off the shelf leverguns are equipped with buckhorn or semi-buckhorn rear sights and a brass bead front sight. While buckhorn sights aren't terrible, they are by no means your first choice and I'd replace those post haste. They get in the way of your target and obscure what you're trying to aim for and your eyes are constantly trying to shift between looking at the rear sight, front sight and your target. It's a mess. But what are you to replace them with? I've found an answer that satisfies me. At the moment my experience with optics such as scopes and red dot sights is extremely limited, and it would be irresponsible of me to recommend which types to buy without having used them myself.
What I do recommend however is the old aperture sight or peep sight. This is simply a circular hole that you look through instead of lining up a notch with the front sight. These are amazingly easy to use, and I don't plan on using any other sort of iron sight on any of my long guns if I can help it. You see, your eye naturally wants that front sight to be centered in that circle, which you look through and not at. You don't have the problem of wondering if the front sight is in fact covering what you want to.
Last time I went shooting with my Marlin, having dry fire practicing the crap out of it, I opened up with some light handloads at approximately twenty yards at various bits of junk from an off hand position. When I deliberately focused on one particular portion of license plate we had handy I was able to put a handful of shots through a single, ragged three in wide hole. Heck, some of my bullets actually went through that same hole! And this was with test loads from an unsteady position, albeit at fairly close range. This is not in an attempt to brag about my prowess with the rifle, but rather to demonstrate what I've been able to do from personal experience.
While some may turn their noses up at a three in circle at that range, I was darned pleased with myself. Whenever you're out shooting and your bullet holes are touching each other, you're doing something right.
Now, lets discuss the various types of aperture sights out there and some of the front sights you should roll with. I personally use a Williams adjustable rear sight, shown here:
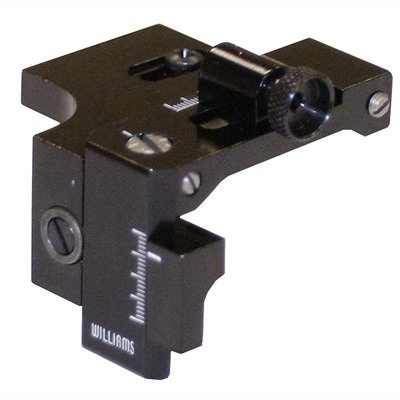
This particular one is meant for side ejection lever guns, and it can be a bit clunky, but it has an amazing capacity for adjustment with elevation and windage which I really appreciate. There are many other types though that will serve quite well such as Lyman and this group that specializes in peep sights. http://www.skinnersights.com/index.html
http://www.williamsgunsight.com/
http://www.lymanproducts.com/lyman/sights/66-receiver-peep.php
All of these sights are well made and will serve their users quite well.
Another that has come into popularity is the "Ghost Ring" sight, which is an apt name. This sight, standard on the Marlin 1895 Guide Gun in the 45-70, a splendid rifle, has a very wide aperture that becomes a hazy, vague ring when aligned, thus having almost no problem with obscuring the target. It is extremely fast in lineup and is superb for ranges under 200 yards, although I'm certain better shots can take it farther.
Side ejection rifles that are already drilled and tapped for accepting sights have a superb range of options and require few modifications to come into working order. Top ejection rifles, most being Winchesters, are a little more tricky. Luckily, most websites and boxes what sights are compatible with what rifles. If you have a rifle that needs to be drilled and tapped you will require the services of a gunsmith. Luckily this is a very simple procedure and any gunsmith who can tie his shoelaces can get that done with little trouble.
My own Williams sight can be turned into a make-shift ghost ring simply by removing the aperture fitting. Very effective! Speaking personally though I prefer a very small aperture, the one that came with my rifle being standard for target shooting rather than hunting. Yet I can line it up in a heartbeat with no trouble, and I even plan to get a smaller aperture for even greater precision.
There are many sizes one can get for these changeable sights, including some that help in low light conditions:
http://www.brownells.com/rifle-parts/sights/sight-accessories/sight-apertures-prod862.aspx
http://www.brownells.com/rifle-parts/sights/sight-accessories/twilight-apertures-prod26077.aspx
I would also like to take a moment to speak of the front sights one can use in conjunction with aperture sights. There are two basic types: Post sights and dot sights. The post sight is simply a vertical bar and a dot sight is a post with a small bead or circle at the top.
I myself prefer bead types, which can come in many variations. There are simple blackened parts, brass beads and fiber optics. There are many sizes for these, and I recommend something with a very small profile for greater precision. At longer ranges a brass bead can end up covering most of a target.
Fiber optic foresights can be extremely useful in conjunction with aperture sights, as they capture light very effectively in low light conditions, almost seeming to glow. I've heard more than one person describe using such a set up as being like using a red dot sight without any electricity. A very nifty combination indeed! I'm attempting to switch my brass bead sight for a red fiber optic sight and will give my opinions on it when the chance arises.
Another style of aperture sight is the older and most interesting vernier sights, often mounted on the tang of older Sharps rifles. While undoubtedly effective, they are a bit too complex and pricey for the terms of this article, as one might be better served with simpler aperture sights or a scope if one requires greater range.
Most Marlin side ejector rifles, if not all, are capable of accepting a very nifty and robust Picatinny rail which allow you to mount all sorts of different optics with ease. If your budget allows then you may be interested in acquiring one, especially if you have some decent experience with scopes.
I consider a sling a very important part of a rifle, as it does more than just allow it to hang from your shoulder. It is also a valuable tool to help improve aim when firing from the offhand position, which you may be forced to do. I highly recommend having a sling on hand. However, this requires swivel studs, which not many lever actions are given off of the shelf, which means you'll have to do a bit of modifying. As we're dealing with tube magazines here, you'll need a special stud pictured below that wraps around the magazine. Make sure it's of proper size and that it doesn't touch the barrel.
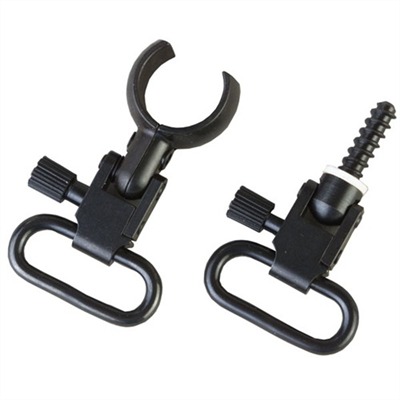
There are some fore end caps that have a swivel stud already attached, but bugger if I could find one for sale. You'll have better luck finding the above pictured parts, as they can be acquired in just about every firearm shop under the sun. Very cheap and effective. However, for the rear mounted stud, if you rifle is not already tapped with one, you'll have to drill a hole yourself, although I recommend employing the services of a gunsmith to help you with that, as it is VERY easy to mess up. Of course, this is where having a gun nut friend comes in handy if you're trying to save money. My dad and I were able to install the rear stud ourselves without trouble, although I don't exactly recommend trying it if you can help it. As a side note, do NOT drill into that little bulls eye in the stock if it's a Marlin. That is meant as a little motif for the brand and not a "Drill here" marker if you want to put in a stud.
As for slings, there are innumerable types and variants, too many to list. I'd suggest when shopping in a hunting place to feel some of the models on display to see what feels best in your hand and suits your particular needs. Most aren't terribly expensive and will serve quite well. I might suggest some of the stretchy, rubbery types though, as when on the trail this will make your rifle seem much lighter when over your shoulder. The rubbery sling will absorb the downward pull, saving your feet and shoulder a lot of energy and annoyance.
I have seen bandolier style slings that are fitted with dozens of shell loops, but I would remain cautious with these, purely because when you try to aim off hand the heavy sling will sway side to side, throwing off your aim. My personal sling only has four shells tucked inside it and that alone makes it sway from side to side like a belly-dancers hips. Not that I would know what belly-dancer hips move like. Ahem. It can also get in the way of a steadying technique, which I'll get to in a moment.
There are a number of after-market levers one can purchase as well, often varying in size and shape. Some are larger loops than standard, which can be helpful if you are hunting in cold weather conditions and are wearing gloves, as this will allow you to work the action without having to take your glove off. I've also noticed that somewhat larger loops help in working the action faster than smaller loops. I believe that the extra space allows the hand to gain some more momentum and thus push the action forward more effectively. You don't need to get a huge loop however, despite how pleased Chuck Connors might be. After all, we are operating on a budget!
Stock sleeves can be a cheap and useful addition as well. Some have bullet loops for extra shells, pouches for spare cleaning tools or built in cheek rests to help with sighting. All are nifty and won't put a huge hole in your pocket, so they are worth taking a look at.
Another lesser known but quite fun addition you can make is a wrap around the lever, as shown here: http://www.marlinowners.com/forum/new-reference-material/17159-wrapping-levers-examples-how-why.html
I like to think of this as a "Survival rifle" trick, although it doesn't have as much purpose as the other items mentioned above. It is useful though and I like having one made from paracord on my lever. My dad expressed his approval at my spectacular handiwork by saying "Son, I wish you wouldn't decorate your gun up like a French whore." Nothing like fatherly encouragement to lift your spirits!
It does have use though, as it can help keep you from battering your knuckles on the hard metal when working the action if you're a sissy like me.
If you're lost in the woods it can be used to start a fire by using the following steps:
1. Remove the leather cord or paracord from the lever.
2. Make a bow drill with the paracord.
3. Spend the next hour or so with the bow drill trying to make a fire through friction
4. Ignore steps one through three, leave the paracord wrap on, pull the lighter you brought along out your pocket because you're a smart little survivalist who thought ahead and doesn't make life any harder than it needs to be.
5. Use the lighter to make a fire, enjoy the warmth and enjoy the pretty paracord wrap on the lever of your rifle.
Simple, right?
Now, for some of the tactics in its usage. For the basics in holding a long gun along with stances you should find a gun nut, you'll know them when you see them. If you're a beginner with firearms there is no harm at all in asking for advice. Gun nuts like few things more than teaching a newbie how to shoot well. They positively salivate at wanting to educate and most will want to teach you without any sort of compensation. Again, you'll know them when you meet them.
It's difficult to explain some of the tricks and such through mere text, so I'll leave a lot of the basics to better minds than my own, and stick to some of the little tips I've caught up on.
A trick I do with the lever to speed up the action slightly as well as achieving a decent trigger pull is grabbing the rear of the lever between my pinky finger and ring finger. This attaches my hand to the action quite nicely and allows me to cycle the action very well. Depending on the size of your hands this may or may not work well for you, as first and foremost you want to have your trigger finger in the right spot for proper squeezing. This just happens to work well for me.
I've found that using the crook of the finger works best, but again, depending on the size and shape of your hands you'll have to find your own sweet spot that works best for you. This is why I recommend buying some snap caps and practicing the almighty crap out of your rifle. Snap caps will help prevent the firing pin from suffering damage as well as giving you loading practice. Sticking a thumbtack in your wall and taking some time every day to get a feel for the trigger and getting used to handling the firearm will work wonders for you. You do however need to be paranoid about safety here, as no amount of apologizing will fix any problems if you're stupid enough to have a live shell in the action while dry firing. I'm obsessive compulsive about checking my action after every few dry shots, and I'm glad to say I've never once had a bullet go off by accident. You can't be too safe about this. You only need to mess up once. Don't let it happen to you.
Dry fire practice is a monumental help, as it teaches one to pull the trigger and aim without flinching, as many people do after experiencing recoil. It is also the best way to get some sort of practice if you're on a budget and have a problem getting out to the range like myself. Practicing is the only way you'll become good, and I've yet to hear of any great shot who didn't recommend constant practicing.
A common trick to help with accuracy is with the sling mentioned above. There are two primary methods with this. First you use your non-shooting hand to grasp the forend wherever it feels most comfortable, stick your elbow through the sling and then angle your arm outwards until you get proper tension. This really helps when firing offhand and keeps the gun from swinging around like a whirligig during the moment of truth. It's very fast, so you have no excuse to not use it.
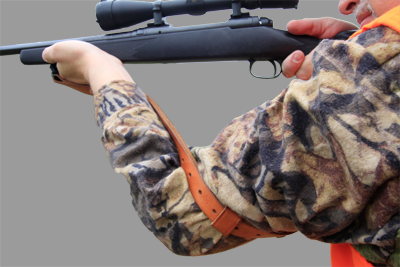
The second, and one I advocate, is sticking your entire non-trigger arm through the sling and wrapping about your arm once before grabbing the forestock as shown here by someone far better as photography than myself.
In fact, I urge all shooters to look at all of these positions, as you may end up using all of them depending on your circumstances. All are valid and it always feels good to do something right when action calls for it.
http://www.tpwd.state.tx.us/outdoor-learning/hunter-education/online-course/shooting-skills/rifle-positions
Another trick that I like is shown here by these amazing firearm designers: http://www.b-mriflesandcartridges.com/Safari-Rifle-Sling.html
Also, check their information and research out if you're a ballistics nut. These guys are supernatural and I bow before them.
Loading is straightforward, but annoying. Depending on the tension of the springs you're likely to bruise your thumb shoving shells through the loading gate and against the spring in the tube. With enough use the gate will hopefully become less stiff and allow you to top off the magazine more easily. That will take some time however. The only trick I've heard of that seems to help is to put the first shell in only halfway which keeps the loading gate partly open and at its least stiff. The following cartridge is used to push the first in and stay at the halfway point itself. Rinse and repeat.
So far this seems to work just alright. I hope to learn of other possible tricks to speed up loading and make it easier. As mentioned before, say it with me now, practice. The tube magazine setup allows you to top it off without disabling the action, an extreme advantage in combat. You are always at your most vulnerable when your firearm is reloaded. Thus the capacity to keep your magazine full during lulls in combat gives you a decent edge. You also don't need to lug around a ton of magazines. Sweet!
A far lesser known set of tricks that I've come to know about are advocated by the superb writer Peter Capstick in his book Last Horizons, which you can purchase on the Kindle Ebook system for a decent price: http://www.amazon.com/Last-Horizons-Hunting-Shooting-Continents/dp/0312025351
Using a handy rest out in the field can work wonders and are fun to boot! If you have trees handy, you simply place your left hand against the trunk if you're a righty, and extend your thumb. You then rest the forestock of your rifle across your thumb, careful not to let the barrel touch the tree, and let 'er rip. Very steady!
You can do similar stuff on uneven ground, such as resting your rifle on a fallen tree or rocks, using something soft for insulation to prevent the vibrations from throwing things off. Using a hat for a rest is most nifty in those situations.
If you have a walking stick you can use it as a monopod, again with an extended thumb and preferably crouching. Quite steady out in field conditions and far superior to firing offhand.
I myself came up with an extremely convoluted yet fun rig for field shooting. Upon purchasing the Cold Steel two handed kukri machete and sheathe, featured here http://www.coldsteel.com/Product/97THKM/TWO_HANDED_KUKRI_MACHETE.aspx I did some modifying. Specifically, I made a paracord loop through the lanyard hole and hooked a Voodoo Tactical rifle sling to the end. Boom! Portable cutting implement that can be used as a monopod in a heartbeat or a slashing/stabbing weapon if for some reason the rifle thing isn't working out. Or you can just use it for splitting wood or clearing brush when out in the boonies. A simple snap of the end clip and the thing is free for all kinds of different work without being glued to you. It's a bit annoying how it slaps against my legs when walking, so it probably isn't the most practical thing in the world, but it is kind of fun!
Here's a link to the nifty Voodoo sling.
http://www.amazon.com/Last-Horizons-Hunting-Shooting-Continents/dp/0312025351
I hope that this article has been of some help. Remember, follow firearm safety rules at ALL times, and practice constantly.
No comments:
Post a Comment